How to Make Amazon's Alexa Open and Close Your Blinds
Brian Harms, the owner of a very smart house in California, teaches us how to use an Amazon Echo in surprising ways.

Technology is supposed to make everything easier, right? Brian Harms sure seems to think so. A research and development specialist for a tech company, Harms has dedicated a large chunk of his free time to making his California abode smart. Harms employs his tech savvy to cut himself out of quotidian chores. The way he does it is surprisingly simple — and easy to emulate.
The foundation for Harm’s home improvements is a program called SmartThings, which uses a smart phone app, a single hub connected to your Internet router, and however many smart devices to monitor activity in your home, control smart devices with a single tap, and automate responses based on chosen preferences.
Harms also has the IFTTT (If This Then That) app, which uses sensors to link triggers with automated reactions between smart devices. For example, IF the sensor detects that the sun is setting, THEN your smart Hue bulbs will automatically turn on. With the SmartThings set up and the integrated IFTTT app, Harms has added smart features to his home, including a thermostat that automatically heats or cools, a drop cam that keeps an eye on the dog, and a vacuum that works when he’s out of the house.
Harms’ most recent addition to his smart house uses the voice activated Amazon Echo, aka Alexa, to open and close the blinds in his living room. By creating and then installing a smart device on his blinds that SmartThings can interpret, commands given to Alexa—who is also linked to SmartThings—can directly transfer to the device on the blinds. Some of the following details about the voice activated blinds system may seem complicated, but there are actually very few mechanical components involved. Besides an Amazon Echo and the SmartThings set up, all you need for this project is a hobby servo, a servo horn, and off the shelf or laser-cut gears. First, mount the gears on the servo horns, and then connect the horns to the servo hobby.
Servo hobby is the black box, the two items in the front on the left are the gear parts, and the wrench-looking item on the right is the servo horn.
Harms decided that the goal of his project would be to have the automated servo hobby replace the function of the rod that hangs down from the blinds (we’ll call it the perpendicular rod for convenience), which opens or closes the blinds when turned manually by rotating the horizontal rod that lies in the channel at the top of the blinds. For Harms, manual processes are the enemy. In order to have the servo hobby replace the function of the perpendicular rod, it needs to spin the horizontal rod. So he took out the perpendicular rod altogether and then removed the plastic interface that connects it with the horizontal rod. Then he mounted the gears and the servo hobby.
Here’s what the process looked like, step by step:
Gears mounted on the horns, connected to the hobby servo
This is what the blinds look like before any modifications. You can see the horizontal rod that lies in the channel, the vertical rod that hangs down (which you manually turn to open or close the blinds), and the plastic interface that connects them.
First, this is the perpendicular/vertical rod that Harms completely removed
Taking out the plastic interface comes next
The plastic interface removed
Slide the shaft gear onto the horizontal rod
The gear mounted on the shaft, and the hobby servo held in place by two pieces of acrylic on either side
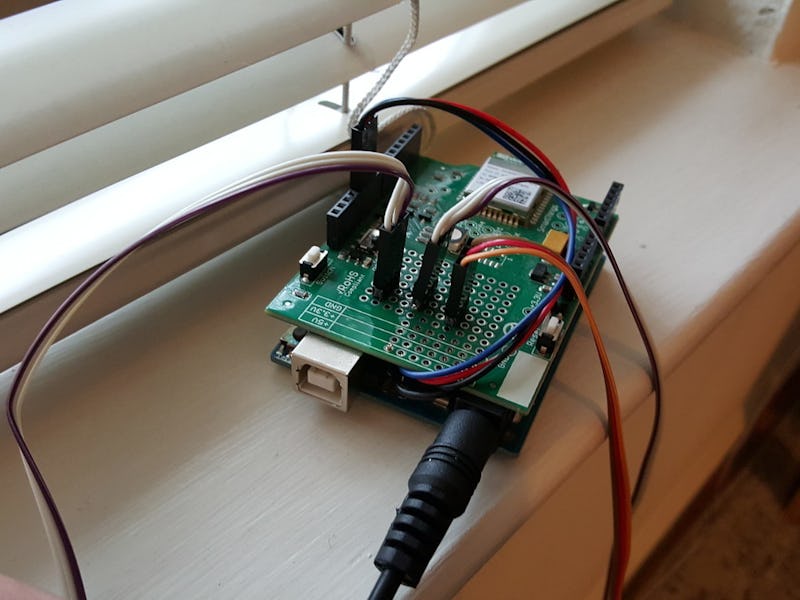
Now that the device has been installed, effectively replacing the function of the perpendicular rod, it’s time to connect the hobby servo wires to a smart device so the SmartThings app can control it. Harms used an arduino, or a microcontroller that he bought for $25, which takes orders from the SmartThings app after a SmartThings shield is placed on top. He plugged the wires from the hobby servo into the arduino and then placed a SmartThings shield on top of it so that it shows up in a list of smart devices as “blinds” on SmartThings. The way he has all his lights, switches, and sensors connected to the SmartThings app, and now, the arduino with the SmartThings shield is hooked up too. Since Alexa is also hooked up to SmartThings, any commands given to her about “blinds” can be carried out automatically.
Arduino on the left and the shield on the right
The SmartThings shield sits on top of the arduino, plugged in
Now that everything is hooked up, it’s time to command Alexa to turn the blinds on and off. “Alexa, turn the blinds on,” or “Alexa, turn the blinds off,” are the magic phrases.